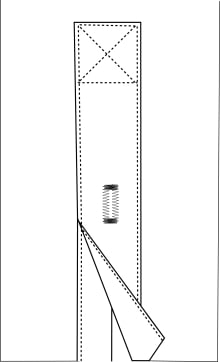
Shorten shirt sleeves move placket.
This article is on how to unpick the placket on a shirt sleeve, cut off the excess and reattach the placket. Just to reiterate there are two options for shortening the sleeves on a shirt with cuffs.
Sleeves can be shortened from the section just above the cuff which means the cuff must be unpicked, the amount the shirt is being shortened will be taken from the end of the shirt sleeve, and the cuff is put back on. This only works when the amount is around half of the length of the placket and if the person does not mind the placket being shorter. (covered last month)
- If the amount being shortened is substantial then the placket needs to be unpicked and moved up, cutting off the excess at the end of the sleeve. This is a rather long process and can be costly if you have a professional do the job. (covered this month)
- If you do not want to move the placket, you can shorten from the top of the sleeve called the sleeve head or sleeve cap. (covered next month)
Option 2 - Sleeve shortened more than 7 cm (2 ¾ in) - Reattaching placket
Unpick the cuff and the placket. Measure the length of the split cut up the sleeve that the placket is attached to. Write down this measurement. Mark the amount that the sleeve is being shortened beginning from the original stitch line. Allow for seam allowance - 1cm (3/8 in). Cut off the excess fabric from the bottom of the sleeve. The opening needs to be extended. Make the opening the amount that you wrote down. Do not cut too high.
Re attaching placket
There are two pieces for the placket. The wider section has the buttonhole and it is always attached to the side that is farthest from the inside arm sleeve seam. The thinnest section is attached on the side closest to the inside arm seam.
Clip out from the top creating a “V” making the clip 7 mm (1/4 in) either side. Look at the top of the original opening to see how it was clipped before. Make sure to only clip the amount needed. Too much and the cut will be seen. Attach the smallest side first. The end of the strip should be 1 cm (3/8in) past the clipped “V”.
Fold in half over the split and stitch down or attach on the wrong side with right side of strip sewn to wrong side of split, and then fold over to right side and top stitch. The 1 cm (3/8 in) at the end if not stitched down.
Join the “V” to the top of the small strip that is not sewn, joining so they are facing the right side of the fabric. This will be covered with the second wide section. The underside should be clean with no seams showing. Attach the wide section right side to the opposite side. It can either be folded in half and stitched into place, or sew one side first up to the “V”, then fold back over to the right side and topstitch. Do not sew the top section above the "V" as this will be stitched down later. Clip the curve at the top so that it sits flat. Press the placket into place.
Fold inner placket edge over raw edges and topstitch close to the edge of the fold. Fold the placket over the opening and pin or baste in place. Stitch a square shape above the sleeve opening. Stitch two diagonal rows of stitching through center of square.
To shorten shirt sleeves move placket takes time and I would be charging at least one hour to do this. If the amount to be shortened is a small amount, I would recommend the client go for the first option which is to shorten the sleeve only.
Happy altering
Judith aka genie

