Shorten jacket sleeves by taking up at shoulder
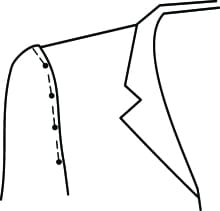
Top of sleeve pinned
Fold the excess fabric over at the top of the sleeve, raising it ONTO the shoulder so that when it is pinned it is pinned at the edge of the shoulder.
Once the sleeve has been pinned into place, there are two ways to record the new position of the sleeve.
1. Slide pins onto the shoulder, and if the sleeve has been folded up, place a pin at the fold. This means when the pins are taken out that held the sleeve up and onto the shoulder, there will be two rows of pins. One on the shoulder and one row on the sleeve. If the sleeve has been taken up as well, slide a pin into the sleeve and remove the pin holding the sleeve to the jacket. If the sleeve is pinned at the original stitch line to the shoulder, then you only need to pin into the shoulder beside the folded fabric.

Back sleeve pinned
2.Do a line drawing of an armhole and write down how much to take from the shoulder. This is for when the shoulder only is being taken up.
When cutting the excess drop of the shoulder try not to make the armhole too wide. This means not taking as much from the sides of the armhole.
If the some fabric is being taken from the sleeve as will, then the sleeve would have been folded up and pinned further down from the join at the armhole. I would do this alteration of taking from the sleeve and the shoulder for a casual loose jacket only. Push pins in to the sleeve section and when pins are taken out that hold the sleeve to the shoulder, measure how much is being taken from the sleeve cap.
Pin some fabric with the words RIGHT SLEEVE and pin to the right sleeve. Repeat with the left. Unpick the sleeves from the shoulder.
For experienced seamstresses, cut beside the pins allowing for seam allowance at the shoulder, and if some is being taken from the sleeve, cut but allow for seam allowance on the sleeve. Make sure to put a nick at the centre top.
Note - Do not cut too far in at the front and back sections. By this I mean that the shoulder is hanging over the arm, but generally the front and back section needs less taken from it. If too much is taken from the front and back the armhole will become too big. Your pinning should always be perfect, so that the sleeve is pinned into place when on the person at the fitting, making sure to not take too much away from the front and back sections (unless it is too big), with more from the top and bottom of the sleeve, but absolutely NONE from the BOTTOM OF THE ARMHOLE on the body of the garment.
For those who are cautious, place dots where the pins were, plus a dot below it on the shoulder for the seam allowance and on the sleeve above it for the seam allowance.
Cut the top of the sleeve, making sure to keep the same curve for the back of the sleeve and the front of the sleeve. Sew around the sleeve cap beginning about 5 cm (2 in) from the underarm seam and sew around the armhole in a gathering stitch. Stop same distance from the under arm seam. Slightly gather the new sleeve cap. It should not have any gathers when it is sewn, but this will give a nice "fall" to the sleeve when finished.
Pin the right sleeve to the right armhole. Begin by pinning from the shoulder seam around to the front then back up to the shoulder seam and around the back. Ease the sleeve in but if there is excess at the inside arm seam, take in or place a dart at the front panel towards the bust. Easing should be done at the side of the front and back of the armhole.
Pin and sew the left sleeve back on to the armhole.
Overlock or serge the edge.
If you do not have an overlocker or serger, you can always do a French seam to attach the sleeve.
When doing this type of alteration, if part of the sleeve cap is reduced, then the reshaping of the sleeve cap is the most important part. If you have made clothes before, and have an understanding of sleeve construction it will help, however the sleeve cap on a shirt is different from a sleeve cap on a stretch top. The shirt is a lot bigger, but it also means they are more forgiving in the shape of the sleeve cap.
My new 3rd Edition has 13 pages dedicated to Shirts and Tops for Taking Up and Taking In, including raising from the sleeve cap. Because the font size has also been reduced, there is more instructions, plus more illustrations.
Happy altering
Judith aka genie