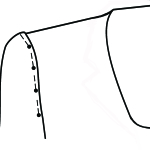
Dropped shoulder is an alteration that can be done reasonably quickly. The sleeve is LIFTED up onto the shoulder so that it is pinned into the correct position on the edge of the shoulder.
This is created from a workshop I did for a lady who had a top with a very low dropped sleeve - around 3.175 cm (2 1/4 inches) below her REAL shoulder edge.
Note that the join of the sleeve to the shoulder (sleeve cap) should ALWAYS be the fold point. In other words, do not just lift the sleeve any old way. Take hold of the seam join and fold at this point so that it is resting on the shoulder.
Pin through all sections starting at the top in the center where the shoulder seam is.
After placing the first pin move around and lift the sleeve into the front panel. You will have to use your eye to gauge where this should be. Imagine the sleeve is set in correctly. Pin the front in this manner slowly tapering off as you reach the underarm.
Move around to the back and pin the back section so that it sits correctly tapering into the underarm.
By the time you reach the underarm on either side you should have no fabric pinned.
The next step is transferring the pin measurements to paper for use when preparing. I always transfer pin measurements. I do not mark and take pins out as I do not believe this is an accurate way of measuring.
I always say to my clients "WHERE I PIN IS WHERE I SEW". That means I must record the exact pin measurements. Which means a reference point is needed. In this case the original shoulder seam and the original armhole seam.
Slide a pin into the body of the garment on the very edge of the folded section. This means once the pins are taken out which is holding the sleeve up and onto the shoulder, the pins will outline where you had it pinned to.
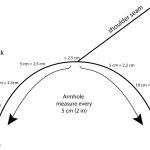
Now create a line drawing of the armhole - see illustration example and transfer the measurements from the pinning to this drawing. I usually write a measurement every 5 cm (2 in) front and back from the shoulder seam.
Generally I will unpick to within 2.5 cm (1 in) either side of the underarm seam. Since this was a stretch fabric it had been sewn using a four thread overlock. I have attached below a link to my YouTube Video on How to unpick seams. This saves a lot of time and frustration because unpicking the wrong way will take over twice as long if not longer......
Place a DOT on the RIGHT SIDE of the fabric as per your measurements.
Life the sleeve up and onto the dot. I had not mentioned about the center of the sleeve until this time, BECAUSE it will more than likely (if a lot is being raised) mean that there is MORE FABRIC in the body of the garment than the sleeve. (Remember NO FABRIC is being taken from the sleeve cap)
AND... because this is a stretch (in this case a two way stretch) I pinned starting at the back, worked around to half way down the front and stopped. I did ease slightly at the back to help take up some of the fabric. Always ease at the sides. I then stitched the sleeve on, sewing with the sleeve seam on the top and stitched around to half way down the front and stopped.
I got the lady to try it on, and I pinned a DART from the armhole to the bust area, taking away the excess fabric.
I then stitched the dart, then went back to pinning the balance of the sleeve into the armhole and stitched it into place.
The excess fabric was over locked off and VOILA - the sleeve fitted perfectly.
Happy altering
Judith aka genie


